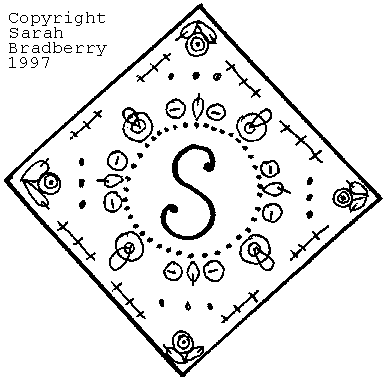
Measurements: This pincushion measures 10 x 10cm.
Materials: Scrap of
off-white wool blanketing, the kind used for heirloom ribbon embroidery.
I found a piece 28 X 23cm to be just big enough to fit in my embroidery
hoop.
8 - 8mm mother of pearl shirt buttons
8 - 10mm mother of pearl shirt buttons
32 metallic copper seed beads with holes large enough to accomodate
4 strands of ordinary sewing cotton
4 clear ruby red seed beads of the same size
8 - 5mm silver cup sequins
6 strand embroidery
thread in the following colours:
pale dusty pink
medium dusty pink rub red (to match the seed beads)
caramel brown
light dusty green (not pale)
medium dusty green
bottle green
Ordinary sewing thread to match the medium shade of pink
Sewing thread to match your fabric
40 - 50 sewing pins with tops in your choice of colour to match the pincushion
Handful of soft filling
Appropriate embroidery and sewing needles
Tissue paper for tracing
Ruler
Set square
Compass
3cm high initial, either hand drawn or from your favourite transfer or computer font.
Method:
1: Trace a 10 x 10cm
square onto your tissue paper. Join the diagonals to find the centre and
draw a circle with a 4cm diameter in the centre.
2: Place the tissue
over your fabric and baste over the outlines of the square and circle
in a contrasting thread.
Make sure you have the grain running parallel to the sides of the square.
3: Embroider the front
of the pincushion as follows, using 6 strands of thread throughout
(except where stated otherwise):
Embroidery Diagram

|
KEY | |
| |
Button, sequin, red bead. | |
 |
Lazy Daisy st. | |
 |
8mm shirt button. | |
| |
French Knot. | |
| |
Running Stitch couched with three evenly spaced stitches. | |
 |
Button, sequin, metallic copper beads. | |
a) Embroider your
monogram in the centre of the circle with the caramel thread using stitches
and thread thickness appropriate to your choice of letter.
b) Embroider the circle with french knots using the lightest shade of green.
c) Embroider the four lazy daisy stitches attatched to the circle using the medium shade of green.
d) Following the
embroidery diagram, sew on the eight 8mm shirt buttons with the medium
shade of
pink embroidery thread.
e) Using 2 strands
of the the matching pink sewing thread sew on the four large buttons
between the
small buttons as follows:
Sew through the button twice
Bring the thread back to the front of the button,
through a sequin,
over the edge of the sequin and through the same button-hole again.
Repeat for the other side of the sequin, using the other button-hole
Bring the thread
back to the front of the button and through the sequin,
through 8 metallic copper seed beads,
back through the first bead you threaded,
back through the sequin and the other hole in the button
Make 2 small stitches on the back of the fabric so as not to pull the
thread too tight
Bring the thread to the front as before, through both the hole in the
button and sequin,
Wrap the thread just below the first bead two or three times to make
the beads able to lie flat.
Take the thread back through the sequin and the other button-hole and
fasten off at the back of your work.
Still sane? My brain hurts...
f) Embroider the three french knots near each corner with the pale pink thread.
g) Embroider the
lazy daisy sts in each corner, and the couched threads on each side
of the square
with the bottle green thread.
h) Finally
sew on the remaining buttons with two strands of the red embroidery
thread in each corner,
so as to form a little "flower", as follows:
Bring the thread
through the button,
sequin, bead,
Back through the sequin,
through the button and fasten off at the back.
4: Cut out the
square, leaving a 1cm seam allowance all round. Cut another square to
match, making
sure you have the grain of the fabric running parallel to the sides
of the square.
5: With right sides
facing, sew the squares together, remembering to leave a hole large
enough to turn
the pincushion out the right way. Trim corners and turn cushion out
the right way.
6: Fill firmly with stuffing (or stuff firmly with filling...) and sew the opening closed with an invisible stitch.
7: Now take all
those lovely coloured pins and stick them in the cushion along the seams,
making sure
you have the same number on all sides and that they are evenly spaced.
8: Finished!